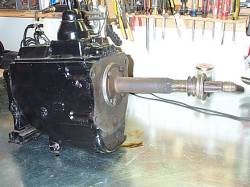
Originally the T-18A manual transmission came out of a J-20 Pickup and the T-18A’s input shaft ran though a 5 inch adapter before emerging into the bell housing. This T-18A’s new life will be lived out in a CJ-7 which has a shorter wheelbase when compared to the J-20. To properly fit the transmission into the CJ-7 the 5 inch adapter would need to be removed. After removing the adapter it becomes necessary reduce the length of the input shaft. Hicks 4×4 Specialists in California sells a short shaft kit for the T-18A. Through OK 4 Wheel Drive, who I preferred to deal with, a kit was ordered from Hicks and OK was able to match the price Hicks gave me for the kit. Swapping the input shaft require that the transmission be disassembled so this is a perfect opportunity to rebuild the T-18A to ensure good reliable service for many years to come. The kit was also ordered through OK 4 Wheel Drive.

Get personalized content recommendations and answers drawn from our website. Simply type your question or topic of interest, and our AI assistant will help you find relevant articles, tips, and insights. You can also have a natural conversation to explore topics in more depth.
The Short Shaft Kit comes with three items. The Shaft, the shaft housing and a pilot bearing.
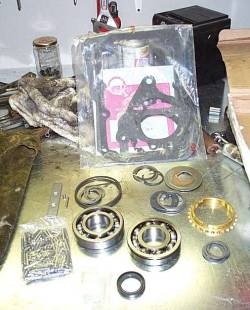
The T-18A rebuild kit comes with 2 main bearings, new needle bearings, new spacers, new snap rings, new synchronizers, new Teflon guides and new gaskets for all the openings.
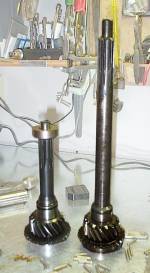
input shaft comparison
Preparation for the Saturday afternoon job included taking inventory of the parts we would need, getting tools together and also adding a sheet of 16 gauge galvanized steel to the top of the work bench. The sheet metal is a great addition to the work bench.
 Some of the tools we needed to have on hand above and beyond the standard set of sockets and wrenched were a soft mallet (copper), snap ring expanders, a 1 inch dowel about 12 inches long, a Haynes manual for the CJ which had a blowup of the T-18A that proved to be handy, petroleum jelly for the needle bearings, ziplock bags for marking bolts and parts as it was disassembled, gasket sealer, carb cleaner, Simple Green Degreaser and a camera. One thing I can say is don’t hesitate to take notes. I know it’s great to just dive in and ripe it apart but remembering how it came apart and what snap ring goes where makes the job go much easier. Also bag and mark old parts. Doing this helped keep track of what went where and made it easy to find bolts and parts when it was time to reassemble. Taking pictures is a good idea too. Having a digital camera was nice because if needed I could review an image taken earlier for whatever reason.
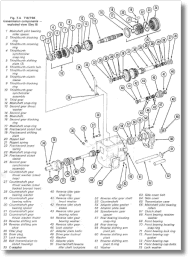
Mike remembered much of the process and was very helpful but if this job would have been done by myself alone or with someone who has not rebuild a manual trans before, the notes taking and pictures would have been very useful. I recommend having a second set of hands. In some cases such as extracting the upper gear set from the case, having two people handling this large and heavy gear set was almost a necessity. Also having a manual to reference and a blow-up image of a T-18 was also very useful for understanding how it came apart and even more important, how it goes back together. For your reference the image to the right links to a printable image contained in a Word document of a T-18 exploded view illustration.
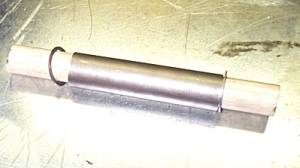
 1 inch dowel is needed for replacement of the needle bearings. Pictured on the dowel is the tubular spacer between the 4 sets on needle bearings. On either end is a washer that spaces out the sets of needle bearings.
Above is the stock input shaft of the T-18A that came out of the J-20. This needs replacement because of the removal of the 5″ adapter between the T-18A and the Bell housing. Hicks 4×4 provided a Short Shaft Kit.
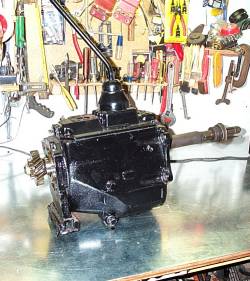
We kick off the project by removing the top of the T-18A exposing all the guts of the beast. Removal of the stick shift is not necessary. Behind the workbench was a table where we could layout all the pieces.

[…] http://www.jeepforum.com/forum/f8/t18-t18a-1299749/ https://www.jeepfan.com/projects/t-18a-rebuild-and-short-shaft-kit […]