• Skip to main content
  • Skip to header right navigation
  • Skip to after header navigation
  • Skip to site footer
Jeepfan.com

Jeepfan.com

serving the Jeep community since 1997

  • Projects & Installs
  • Offroading & Events
  • Technical & Info
  • Readers Jeeps
  • Jeep Racing
  • Products
  • Ask
  • jeepfan.com 2022 4xe
  • jeepfan.com 2018 JL
  • jeepfan.com 2004 TJ Unlimited
  • jeepfan.com 1978 CJ-5
Home » Projects & Installs » BDS 3.5″ GlideWrangler Lift in a CJ – Part 3

BDS 3.5″ GlideWrangler Lift in a CJ – Part 3

I backed the Jeep into my humble little garage and removed the rear wheels to get started on the back. The rear is considerably easier than the front and took about 1/4 of the time. The old springs and shackle mounts were removed (a). The rear springs were installed along with the new upper shackle mounts (b & c). The axle was then placed on the springs and the u-bolts and u-bolt plates were installed (d).

Get personalized content recommendations and answers drawn from our website. Simply type your question or topic of interest, and our AI assistant will help you find relevant articles, tips, and insights. You can also have a natural conversation to explore topics in more depth.

rear_spring_old.jpg (41393 bytes)
(a)
rear_spring_installed.jpg (43322 bytes)
(b)
rear_shackle_installed.jpg (38740 bytes)
(c)
rear_ubolt_plate.jpg (35505 bytes)
(d)

After the rear was all assembled I pulled the Jeep out of the garage for a look. Here is a shot of the garage door clearance I have. Forget putting the top on for now!

garage_door_clearance.jpg (26966 bytes)

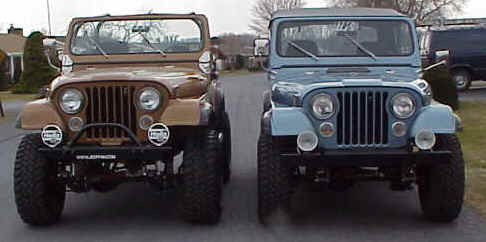
It was immediately apparent that the Jeep was much higher than before. The measurements were now 25.5″ (+3″) in the front and 29.5 (+2.5″) in the rear. The Jeep seemed to sit level and looked pretty good. I must admit at first I was thinking that the Jeep was too high, but it grew on me.

Matt stopped by to check out what was going on and to lend a hand, I pulled my Jeep out next to his for a comparison. Matt’s Jeep has an Old Man Emu 2.5″ lift with 32″ BFG Mud-Terrains.
Soon after I was off to the back yard for a twist test on the rocks. I have an old stump that is good for driving on. I pulled up onto the stump and took some shock measurements. These measurements include ride height, collapsed length, and extended length.

stump_front.jpg (62744 bytes) shock_measurement.jpg (48510 bytes) twist_rear.jpg (51844 bytes)

front_twist_cu.jpg (289691 bytes) rear_shock_meas.jpg (47164 bytes)

Here is a couple of pictures of the Jeep sitting on level ground. There is still a lot to do. The new shocks need to be installed, the sway bar need to be hooked up, the u-bolts need to be trimmed, and so on.

bds_installed_ps.jpg (44686 bytes) bds_installed_ps_rear.jpg (44039 bytes)

Part 4

Category: Projects & InstallsTag: CJ, jeepfan.com 1978 CJ-5, lift kit, Suspension

You’ll also enjoy these posts


check out these trending posts


Jeep Vehicles VIN Reference Guide

 14K+

How Electronic Start Stop ESS Works on the Jeep Wrangler JL

 6K+

The Wrangler 4xe Explained Simply-ish

 2K+

Understanding and Troubleshooting Jeep CJ Gauges and Senders

 4K+

Jeep CJ Exhaust – Headers and Mufflers

 950

Jeep Quadra-Trac 4wd System

 2K+

Receive exclusive recommendations directly from our website.

Sidebar


Jeep CJ 1972-1986 How to Build and Modify

Grab Your CopyJeep CJ 1972-1986 How to Build and Modify

jeepfan.com

  • Instagram
  • Facebook
  • Twitter
  • YouTube

© 2025 · jeepfan.com · Powered by Bizbudding

Privacy Manager

Explore

  • Projects & Installs
  • Technical & Info
  • Offroading & Events
  • Products
  • Racing
  • Readers Jeeps
  • Jeep News & Information jeepfan.com blog

About

  • Contact
  • Advertise
  • About
  • Terms of Use

Partners

  • Quadratec
  • Rough Country
  • TeraFlex
  • Maximus 3
  • 7S Garage
  • OK Auto